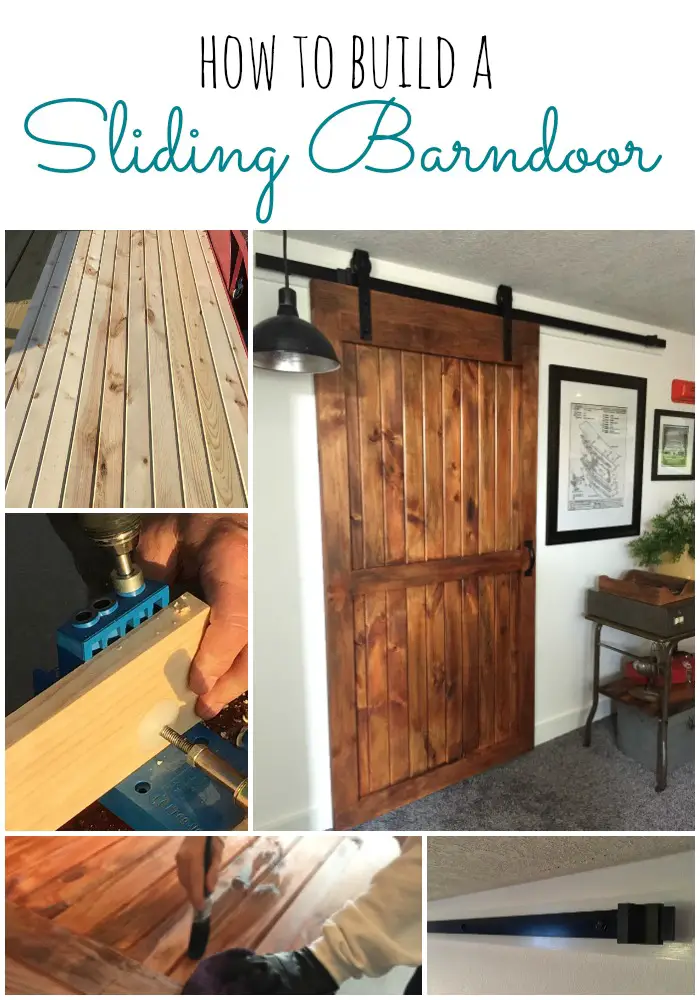
• Home
  • Meet Us
  • Our Home
    • Master
      • Shiplap Shelf
      • How to keep your white sheets white
      • How to upcycle old sweaters into Christmas stockings
      • Dimming the light that shines in the night
      • Master bedroom night stands
      • Our Master “Pinterest” bedroom……
      • Shiplap wall for less than $50
    • Mancave
      • How to build a sliding barn door
      • The Dog’s House
      • A Shiplap Ceiling
      • Painting a Faux Brick Wall
      • Upcycle old frames….I’ll show you how!
      • A bi-fold door in disguise……….
      • A place to call his own……..kind of!
      • how i made industrial lights for the bar
    • Front Porch
      • Hydrangeas are in the air
      • Red, White and Gray-It’s almost Independence Day!
      • Say Hello
      • Holiday Home Tour (Part 1)
    • Kitchen
      • Upholstery 101
      • Harvest Table – Part one
      • Harvest Table – Part Two
      • Holiday Home Tour (Part 2)
      • How to organize a mini office space in your pantry
      • New Bling {Cabinet Hardware} for the Kitchen
      • Transform your dining room table
      • Trays, not just for carrying your lunch in grade school anymore!
    • Living Room
      • Designing a fireplace makeover
    • Garage
      • Got Paint?
  • DIY Projects
    • Painting/Crafts
      • DIY Poster Sized Word Art
      • Fresh Cut Tree Sign
      • Farmers Market….
    • Simple Sewing
      • Add your favorite recipe to a tea towel
      • How to upcycle old sweaters into Christmas stockings
      • Vintage Stockings for $3 or less
      • Upholstery 101
    • Trash to Treasure
      • How to paint on old screens
      • New life for an old brass fixture
    • Miscellaneous
      • How to keep your white sheets white
      • New Bling {Cabinet Hardware} for the Kitchen
    • Electircal
      • how i made industrial lights for the bar
    • Woodworking
      • How to build a sliding barn door
  • Contact Me
    • Disclosures
    • Facebook
    • Instagram
    • Pinterest
    • Twitter

Lyndale Drive

05/18/16

How to build a sliding barn door

I looked at all types of design ideas for this door.  I wanted the man cave to have an “industrial” feel, and most of the pictures I found reminded me of an old barn.  I do love the farmhouse look, however not in this space.

how-to-build-a-sliding-barndoor

There are 4 doors in the man cave (all of them different – arrgh!)  So I had an idea to at least make two of them similar!  I ordered the sliding door hardware off of Amazon.  It came in a brown finish and I really wanted black, so I spray painted it.

Supplies needed:

  • Door hanging kit
  • 7 – 1x4x8 pine boards (we added one behind the door hanger to allow for the width of our door and trim around the opening)
  • 6- 6ft tongue and groove pine boards
  • table saw
  • nail gun
  • Kreg jig
  • stain (I used pecan) and brushes to apply (remember I buy cheep and toss when done!)
  • black paint (you will see why)
  • rag
  • hanging hardware
  • handle

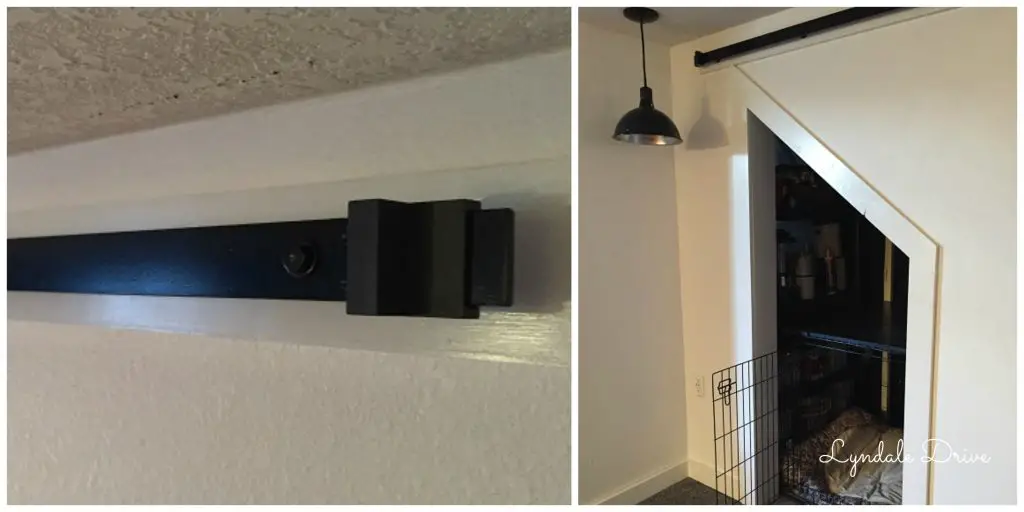
We added a 1×4 behind the hanging hardware kit to allow for the additional width of the door and opening trim.  This also allowed us to anchor the hanging hardware to something solid.  The kit is metric so it didn’t line up with the 16″ on center studs in our home.  By placing the 1x4x6 up first, we could secure this to the studs, then add the hanging hardware where we needed it. 

barn-door-bracket

Building the door:

We have learned over the years of our DIY projects that we are not always the best at measuring!  Never fails, we cut twice and it is still too short!  So this time we decided to lay out the door, measure what we have, determine what we needed and only cut once! (hopefully) We knew we had 78″ from the top of the rail to the floor and the Dog House opening is 36″ wide.

build-a-barn-door

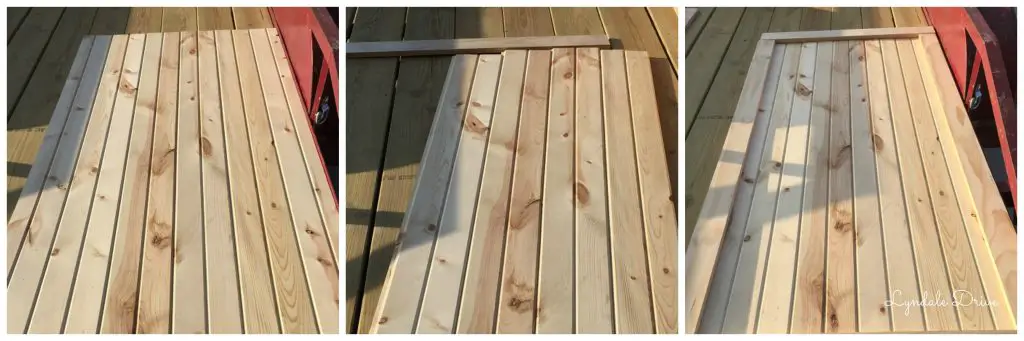
We measured again and cut the boards to size, laid them out again and measured AGAIN! <– it worked!

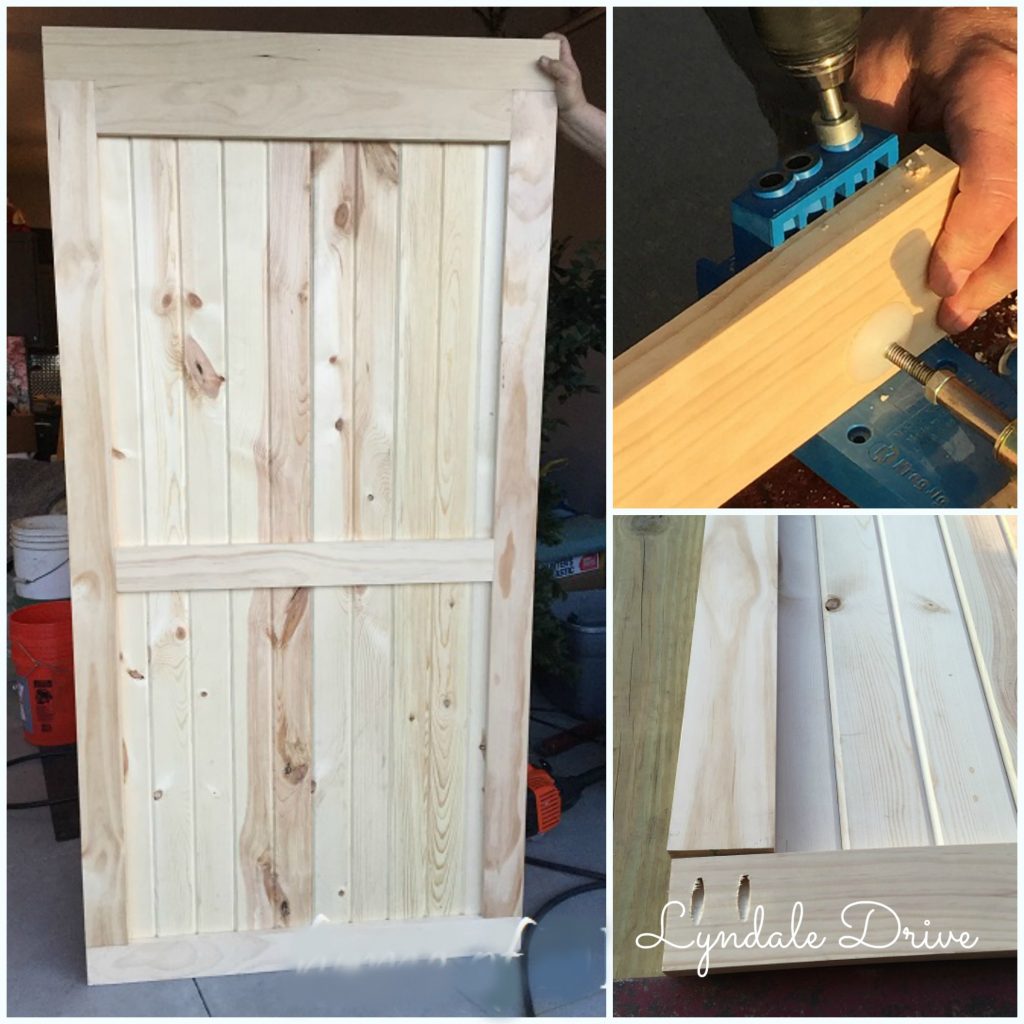
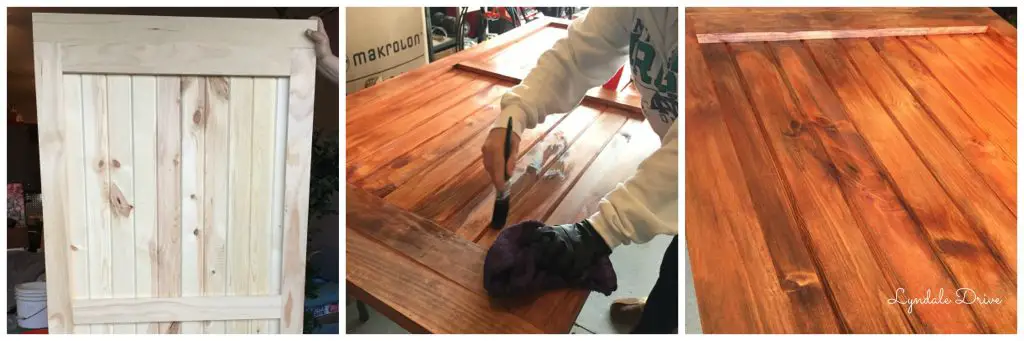
To assemble the door, we used the Kreg Jig.  (an amazing little tool!)  Check it out!

barn-door-steps

Now for stain.  I used a pecan colored stain and then black wash (similar to white washing, but I add black watered down paint to “age” the wood).

Here is how:

I apply the stain using a “cheap” brush and toss when done!  You can wipe off excess stain if you want.  Once the stain is dry (usually over night) I apply the black wash.  I apply a dry brush of black paint to the surface first, if it is too dark, I dip the brush in water and apply a watered down version, then wipe the wood with a rag. I repeat this process until I have the wood darkened to my liking.

barn-door-staining

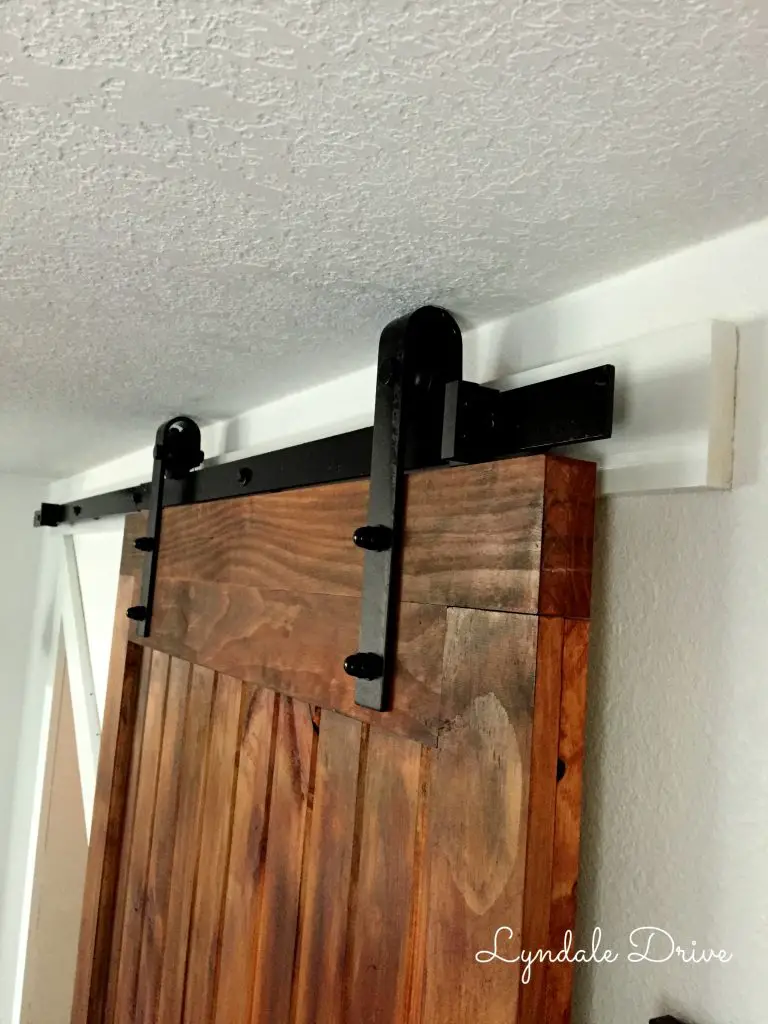
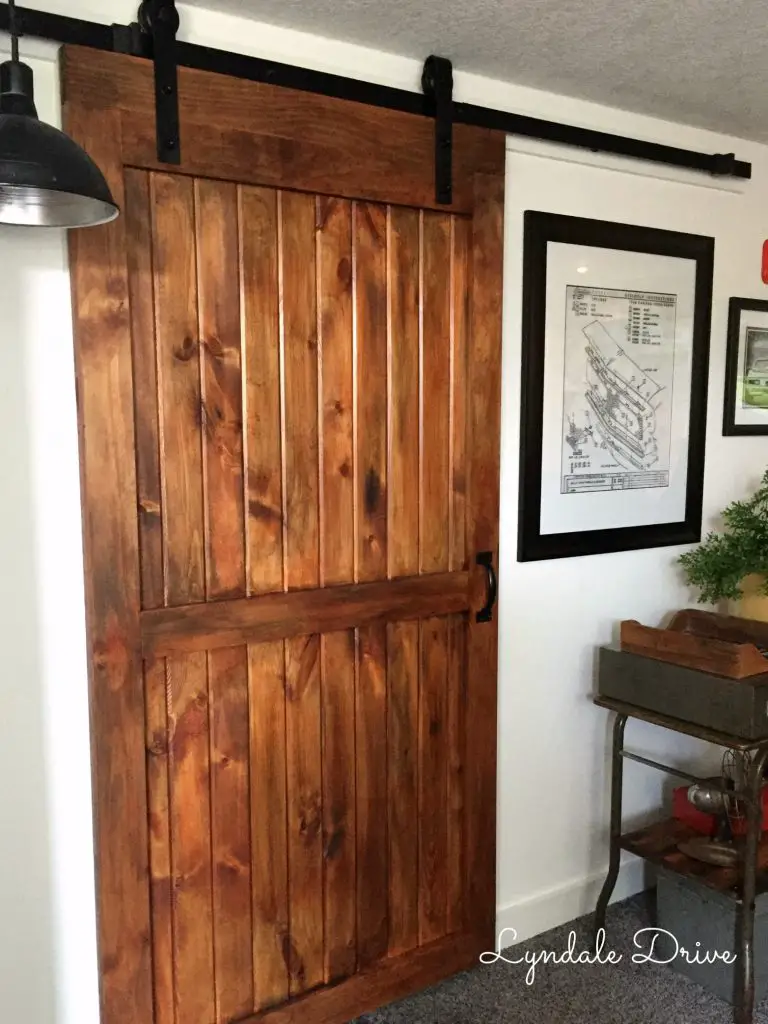
We added the door hanger/rollers to the top of the door at the correct height (pretty sure we measured like 10 times!), allowing enough room for the rail.  Next we needed to remove the door stoppers from the rail so we could slide the door on the rail- we adjusted them after we had the door hung so the door will stop at the right spot.

door-railing

EEEKKK – I almost peed myself when the door was finally hung – I love, love, love it!!! 

sliding-barn-door barn-door

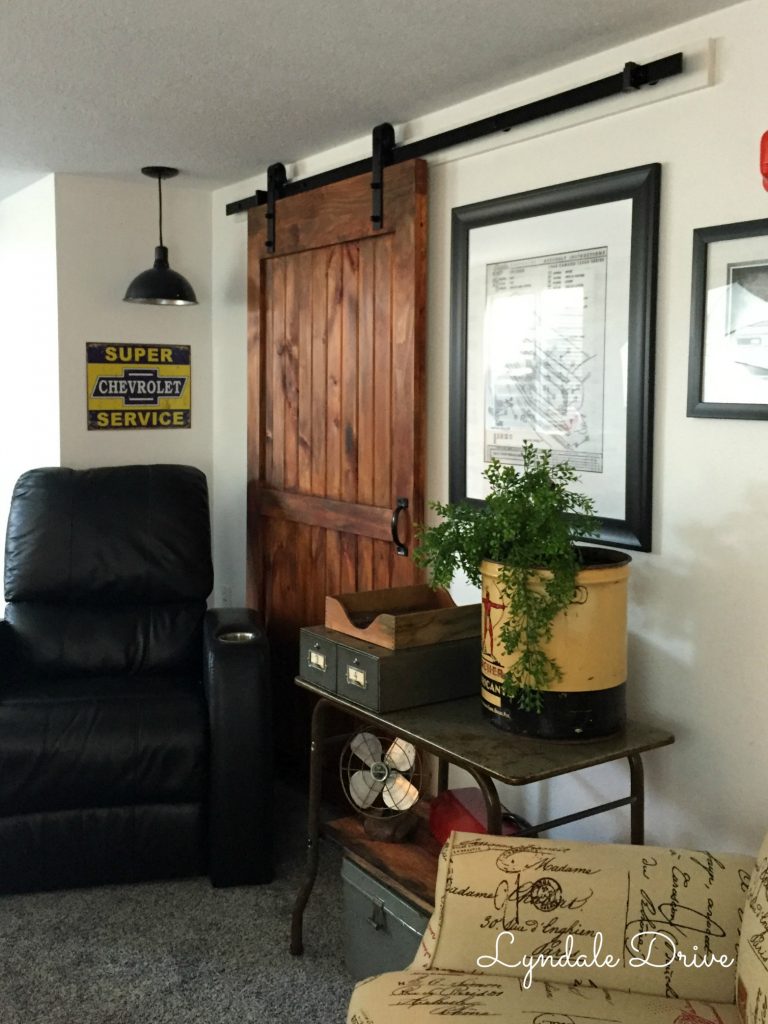
YUP!  That is Mike’s chair in the man cave – equipped with cup holders.  It is the ONE piece of furniture that I let him pick out all by himself.

Signature LD

  • Tweet
  • Email
  • Print

13 Comments
DIY// Featured// Mancave

« That Old Piece of Junk?
The Dog’s House »

Comments

  1. Bobbi says

    May 18, 2016 at 12:11 pm

    Thanks for sharing how you ate doing this. I love DIY projects. Do not make enough time for them but they are more personable then just going out to buy something. Keep trucking along.

    Reply
    • admin says

      May 18, 2016 at 12:27 pm

      Thanks!!! I love DIY myself. I should have started this blog years ago when we lived in our 100 year old house….everyday was a DIY/fixer-upper in that house!! I hope you will keep following us!

      Reply
  2. Julie Erickson says

    May 18, 2016 at 1:02 pm

    Love it, Jodi! Can you come and decorate my house, please!!

    Reply
    • admin says

      May 18, 2016 at 2:02 pm

      Thanks for checking out the blog Julie! Check back often and feel free to share it!
      I’d love to come style!

      Reply
  3. Roger Haines says

    May 30, 2016 at 7:36 am

    Very nice work! May have to do this one.

    Reply
    • admin says

      May 30, 2016 at 9:49 am

      Thanks Roger! We love how it looks in the basement. Be sure to check out how we hid the bifold door with a barn door disguise post!

      Reply
  4. Emily says

    August 6, 2016 at 8:25 pm

    Thanks so much for the tutorial! It looks beautiful! I’m wondering which door hardware you used? The link is to the Kreg Jig and not the hardware. Thank you!

    Reply
    • Jodi says

      August 9, 2016 at 2:19 pm

      I am glad you like it! This door was super easy to build – Sorry my link was wrong – I have updated the link in the post.

      Reply

Trackbacks

  1. The Dog’s House – Home of DIY says:
    May 18, 2016 at 6:15 am

    […] To see how we made the sliding door click here. […]

    Reply
  2. A bi-fold door in disguise………. – Home of DIY says:
    May 18, 2016 at 12:26 pm

    […] you remember my  sliding door post where I said we have 4 doors (three of them are pictured below) in this space and they are all […]

    Reply
  3. A bi-fold door in disguise.......... - Lyndale Drive says:
    September 22, 2016 at 8:58 pm

    […] you remember my  sliding door post where I said we have 4 doors (three of them are pictured below) in this space and they are all […]

    Reply
  4. A place to call his own........kind of! - Lyndale Drive says:
    September 22, 2016 at 9:07 pm

    […] dog house (for the dogs, not Mike) in the hard to get to space under the stairs, equipped it with a sliding door, a great trash to treasure piece that we rescued from dads garage, and a plank […]

    Reply
  5. The Dog's House - Lyndale Drive says:
    September 24, 2016 at 8:18 am

    […] To see how we made the sliding door click here. […]

    Reply

Leave a Reply Cancel reply

Your email address will not be published. Required fields are marked *

This site uses Akismet to reduce spam. Learn how your comment data is processed.

Hello! I’m Jodi

I'm glad you're here! This is where I make my dreams of DIY projects, home renovations and crafty ideas become reality. {I am serious - I dream of these things} I hope you decide to stick around, and follow along as my husband Mike and I make these dreams a reality.

Never Miss Another Post

If you love what you see now and don't want to miss another post....Join Me! I promise I won't flood your email with junk, only a friendly reminder that I published a new post!

Categories

Archives

how-to-paint-faux-brick-concrete-walls
painting-your-garage-door-black
  • Home
  • Meet Us
  • Our Home
    • Master
      • Shiplap Shelf
      • How to keep your white sheets white
      • How to upcycle old sweaters into Christmas stockings
      • Dimming the light that shines in the night
      • Master bedroom night stands
      • Our Master “Pinterest” bedroom……
      • Shiplap wall for less than $50
    • Mancave
      • How to build a sliding barn door
      • The Dog’s House
      • A Shiplap Ceiling
      • Painting a Faux Brick Wall
      • Upcycle old frames….I’ll show you how!
      • A bi-fold door in disguise……….
      • A place to call his own……..kind of!
      • how i made industrial lights for the bar
    • Front Porch
      • Hydrangeas are in the air
      • Red, White and Gray-It’s almost Independence Day!
      • Say Hello
      • Holiday Home Tour (Part 1)
    • Kitchen
      • Upholstery 101
      • Harvest Table – Part one
      • Harvest Table – Part Two
      • Holiday Home Tour (Part 2)
      • How to organize a mini office space in your pantry
      • New Bling {Cabinet Hardware} for the Kitchen
      • Transform your dining room table
      • Trays, not just for carrying your lunch in grade school anymore!
    • Living Room
      • Designing a fireplace makeover
    • Garage
      • Got Paint?
  • DIY Projects
    • Painting/Crafts
      • DIY Poster Sized Word Art
      • Fresh Cut Tree Sign
      • Farmers Market….
    • Simple Sewing
      • Add your favorite recipe to a tea towel
      • How to upcycle old sweaters into Christmas stockings
      • Vintage Stockings for $3 or less
      • Upholstery 101
    • Trash to Treasure
      • How to paint on old screens
      • New life for an old brass fixture
    • Miscellaneous
      • How to keep your white sheets white
      • New Bling {Cabinet Hardware} for the Kitchen
    • Electircal
      • how i made industrial lights for the bar
    • Woodworking
      • How to build a sliding barn door
  • Contact Me
    • Disclosures

Copyright © 2021 · Dainty theme by Restored 316

loading Cancel
Post was not sent - check your email addresses!
Email check failed, please try again
Sorry, your blog cannot share posts by email.