• Home
  • Meet Us
  • Our Home
    • Master
      • Shiplap Shelf
      • How to keep your white sheets white
      • How to upcycle old sweaters into Christmas stockings
      • Dimming the light that shines in the night
      • Master bedroom night stands
      • Our Master “Pinterest” bedroom……
      • Shiplap wall for less than $50
    • Mancave
      • How to build a sliding barn door
      • The Dog’s House
      • A Shiplap Ceiling
      • Painting a Faux Brick Wall
      • Upcycle old frames….I’ll show you how!
      • A bi-fold door in disguise……….
      • A place to call his own……..kind of!
      • how i made industrial lights for the bar
    • Front Porch
      • Hydrangeas are in the air
      • Red, White and Gray-It’s almost Independence Day!
      • Say Hello
      • Holiday Home Tour (Part 1)
    • Kitchen
      • Upholstery 101
      • Harvest Table – Part one
      • Harvest Table – Part Two
      • Holiday Home Tour (Part 2)
      • How to organize a mini office space in your pantry
      • New Bling {Cabinet Hardware} for the Kitchen
      • Transform your dining room table
      • Trays, not just for carrying your lunch in grade school anymore!
    • Living Room
      • Designing a fireplace makeover
    • Garage
      • Got Paint?
  • DIY Projects
    • Painting/Crafts
      • DIY Poster Sized Word Art
      • Fresh Cut Tree Sign
      • Farmers Market….
    • Simple Sewing
      • Add your favorite recipe to a tea towel
      • How to upcycle old sweaters into Christmas stockings
      • Vintage Stockings for $3 or less
      • Upholstery 101
    • Trash to Treasure
      • How to paint on old screens
      • New life for an old brass fixture
    • Miscellaneous
      • How to keep your white sheets white
      • New Bling {Cabinet Hardware} for the Kitchen
    • Electircal
      • how i made industrial lights for the bar
    • Woodworking
      • How to build a sliding barn door
  • Contact Me
    • Disclosures
    • Facebook
    • Instagram
    • Pinterest
    • Twitter

Lyndale Drive

11/10/16

How to paint on old screens

My mom had some old screens off of her house that she had saved when they replaced their windows years ago……….and in great Jodi fashion, I drug them home for a project!   So when my buddy Karen asked if I wanted to join her in making some cool Christmas decorations out of old junk I said SURE!!!  One of the many things we put together were these fun window screens.  how-to-paint-on-screen

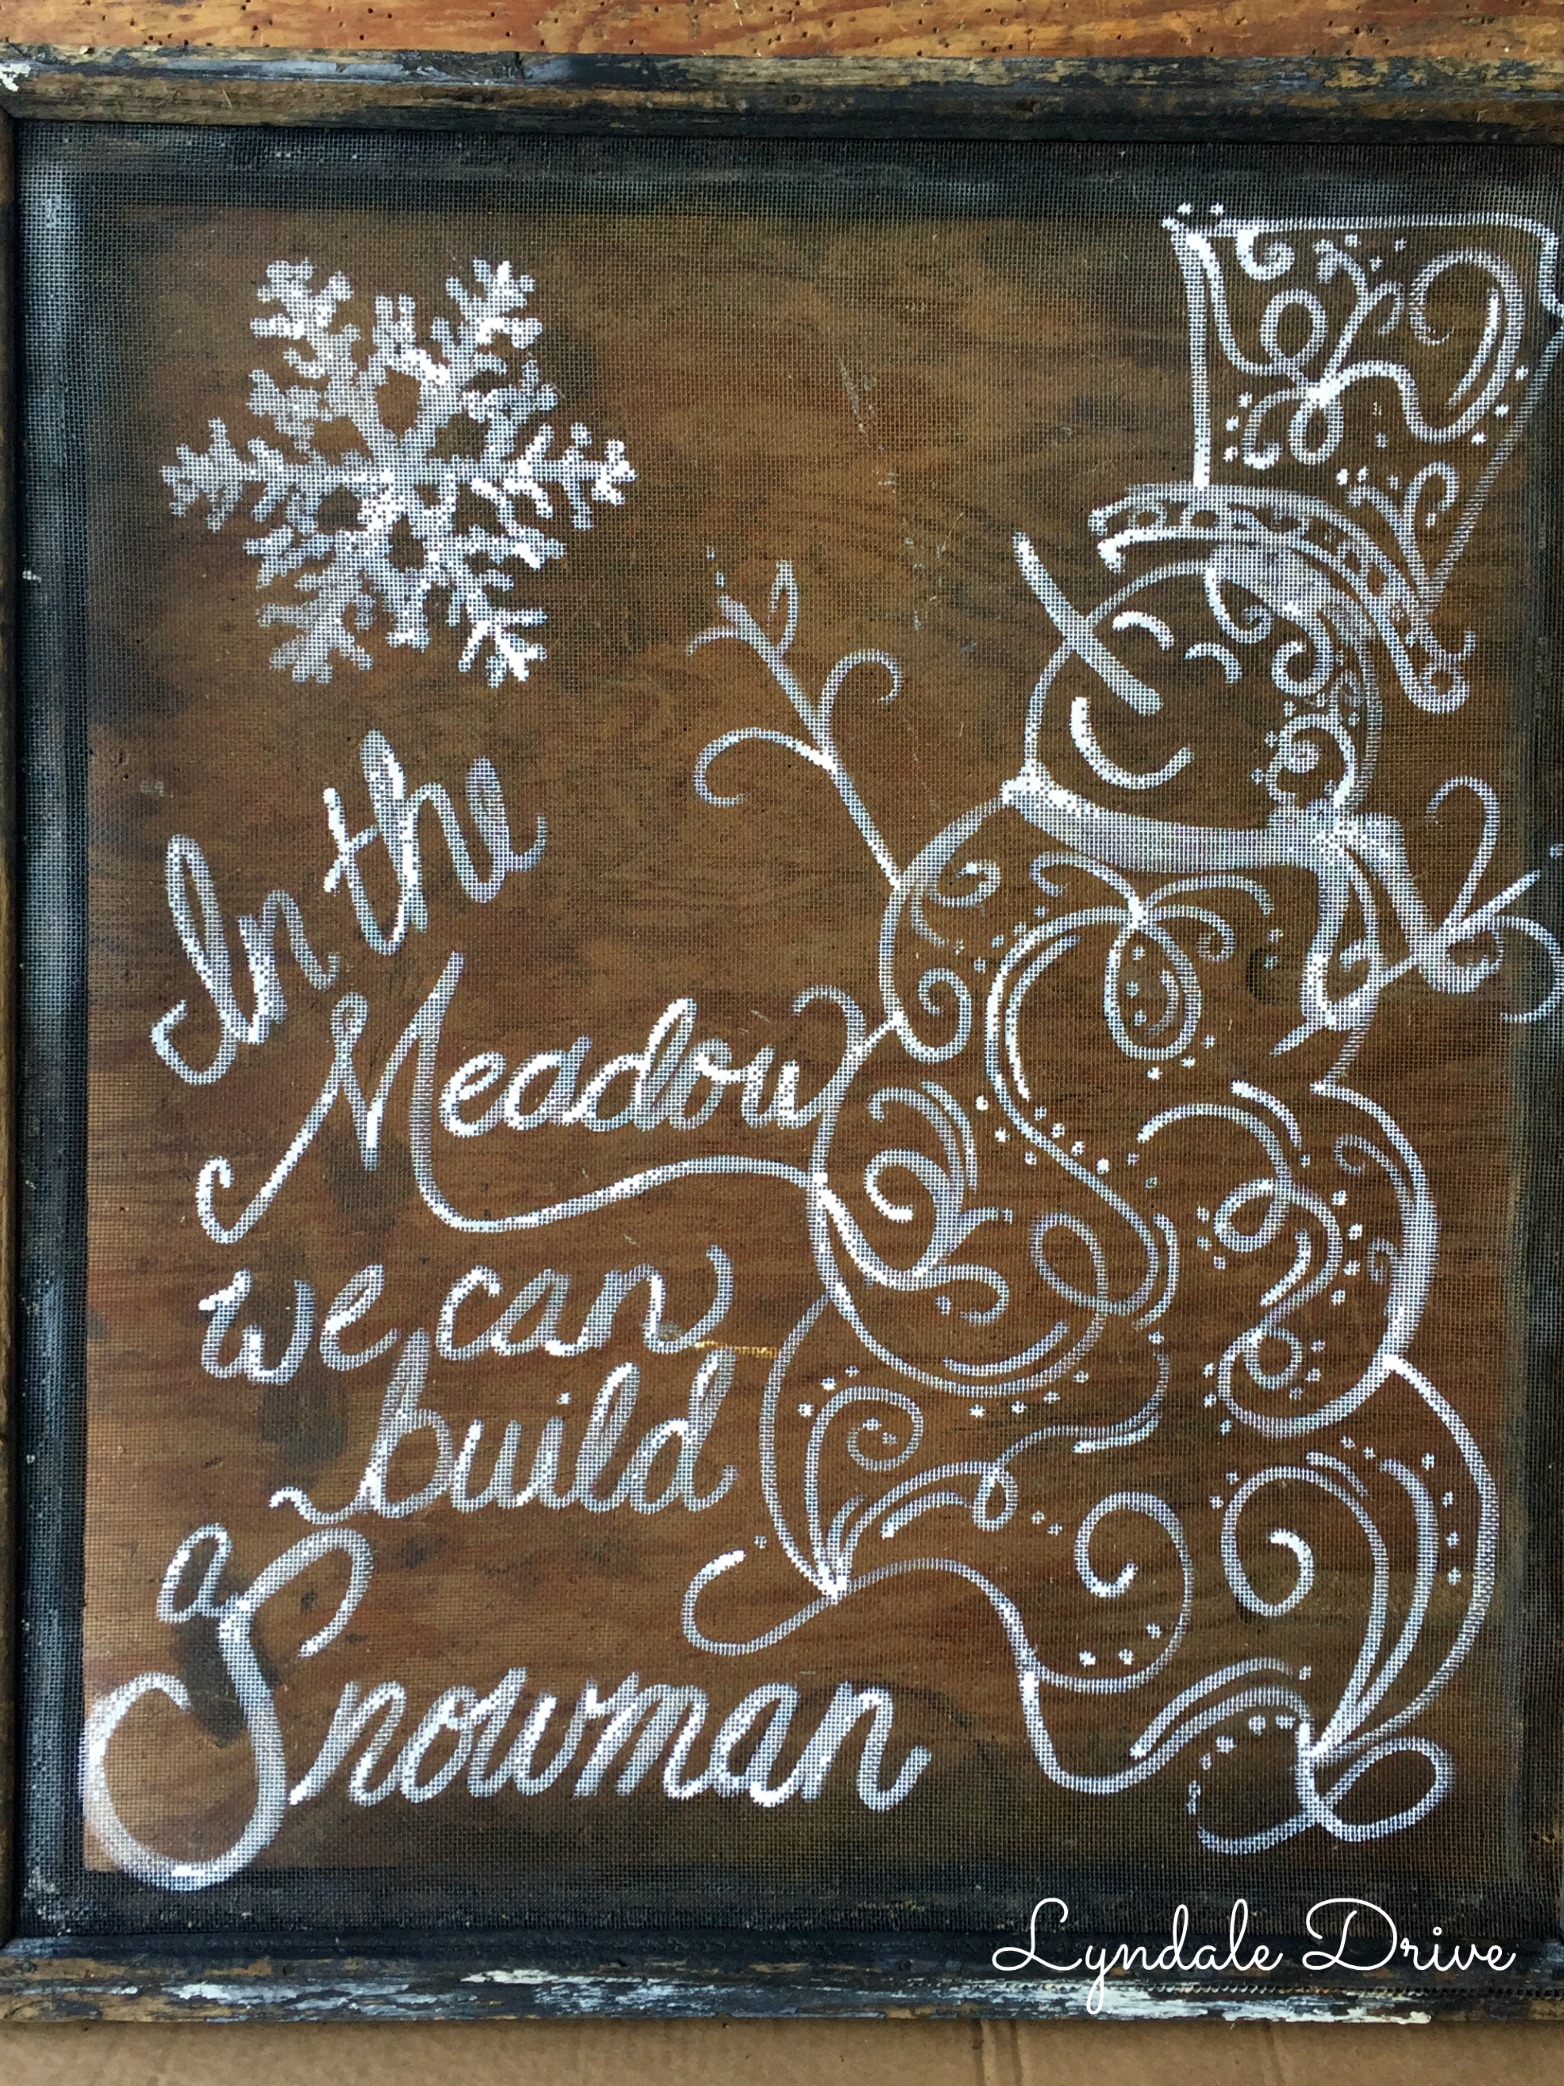
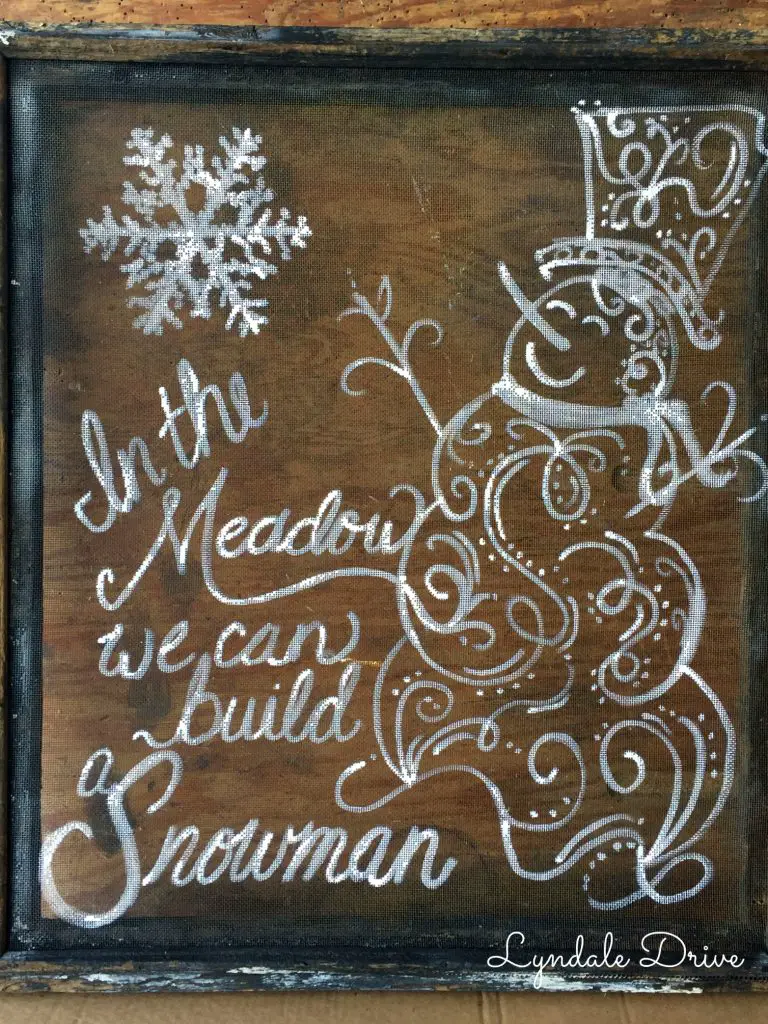
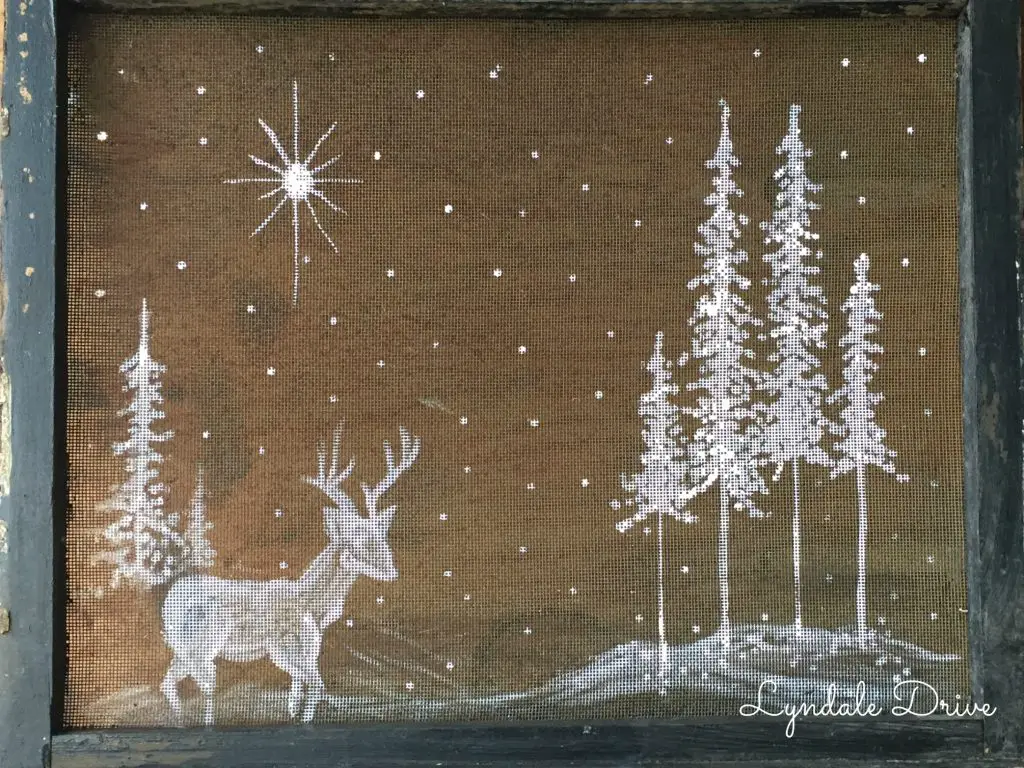
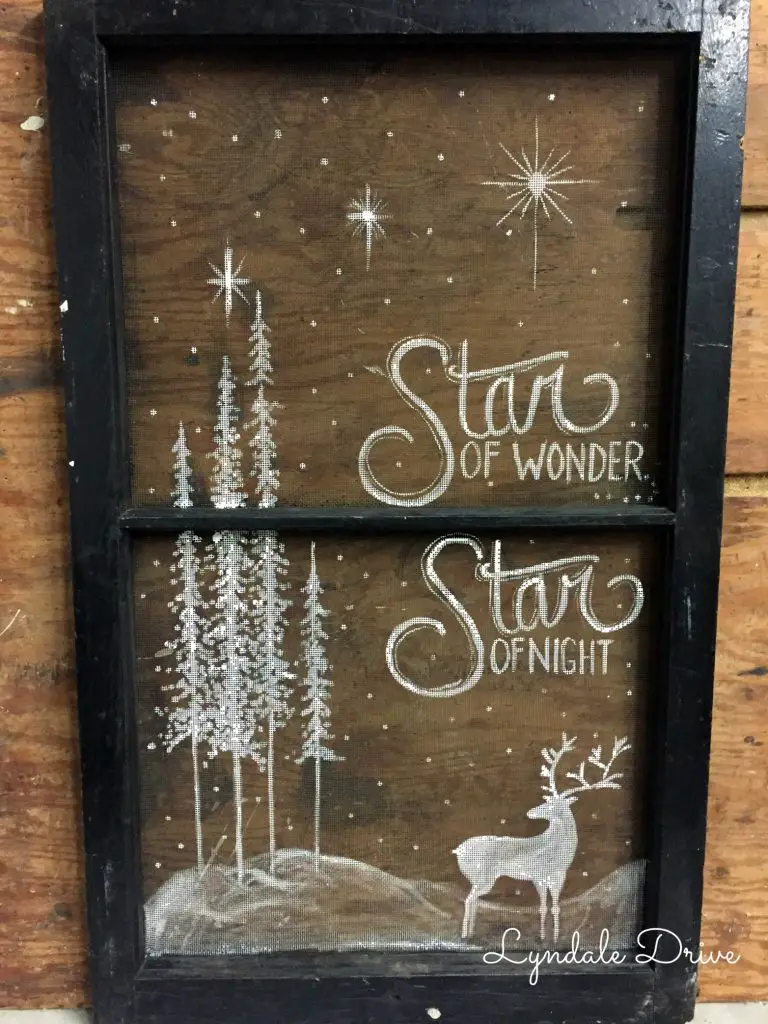
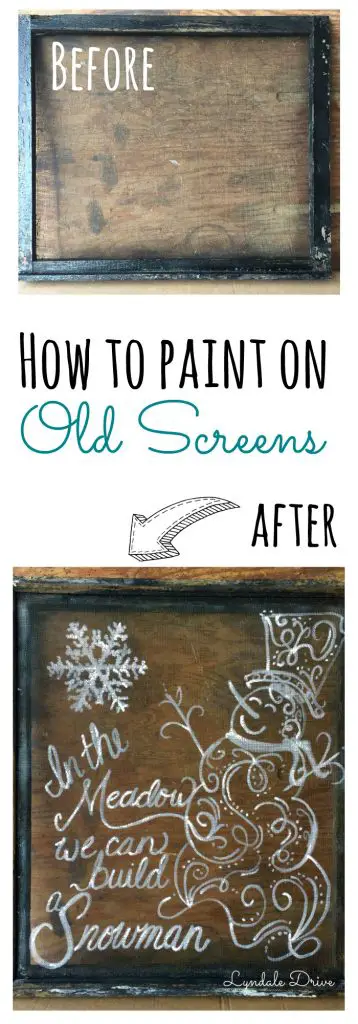
Let me show you how I took this old window screen and painted this fun snowman design on it.

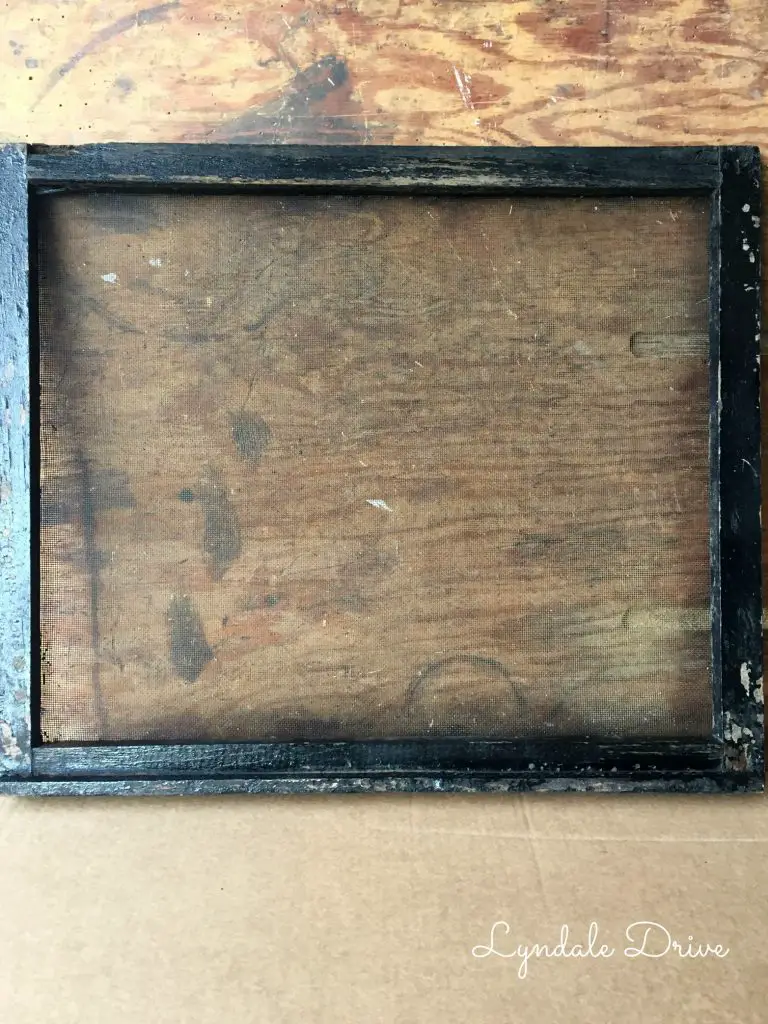
I started with an old window screen and some white paint.  The screen is a black metal so white paint shows up nicely.

old-screen

You will need the following:

  • Framed Screen
  • Paint color(s) of your choice (I used white)
  • Paint brushes
  • Chalk markers

You will want to pick a design for your screen.  If you are good at free handing your design, and trust yourself to not make a mistake…………..get to painting right on the screen and by the way……….I …..am ………. jealous!  I free hand designs, but I erase – A LOT!!  So I don’t trust myself when it comes to painting on the screen with no practice!  I also can’t draw a picture just knowing what the design should look like (you know, if you told me to draw a horse, I am sure you might think I was drawing a pig – really I am that bad), but I can look at almost any design and re-create it.  So when I paint on screens I use this simple technique!

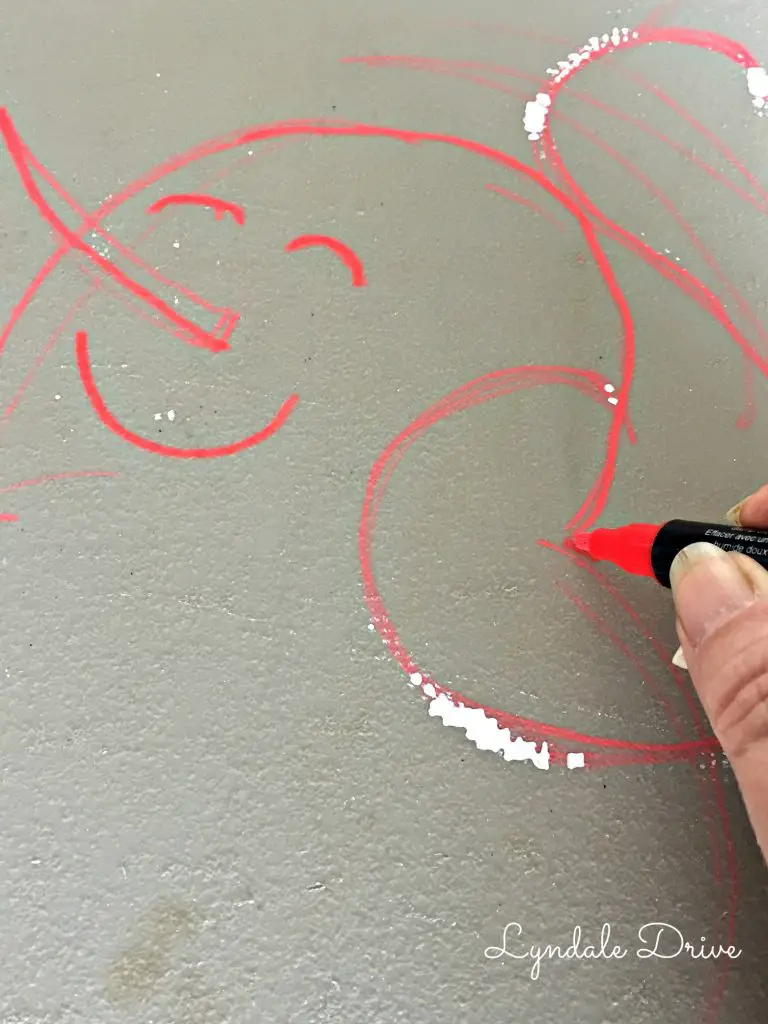
I use a white plastic 6 foot folding table when I am working on my projects.  The table works perfect as a white board!  I use my chalk markers and plan out my design right on the table.

how-to-paint-on-screens

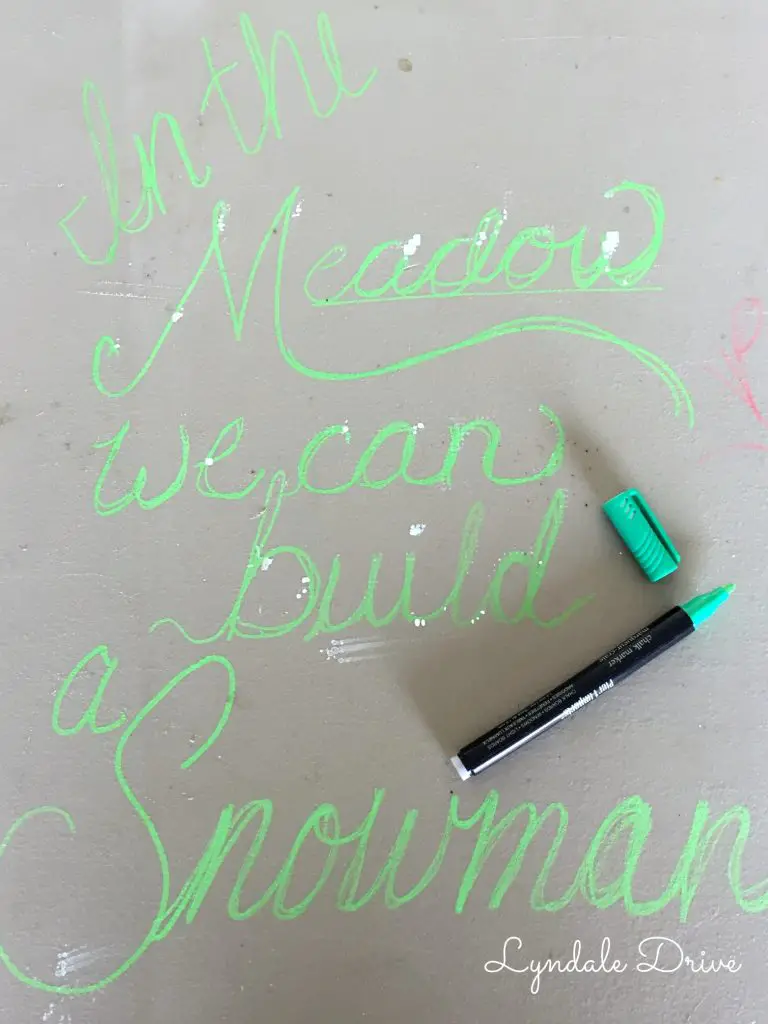
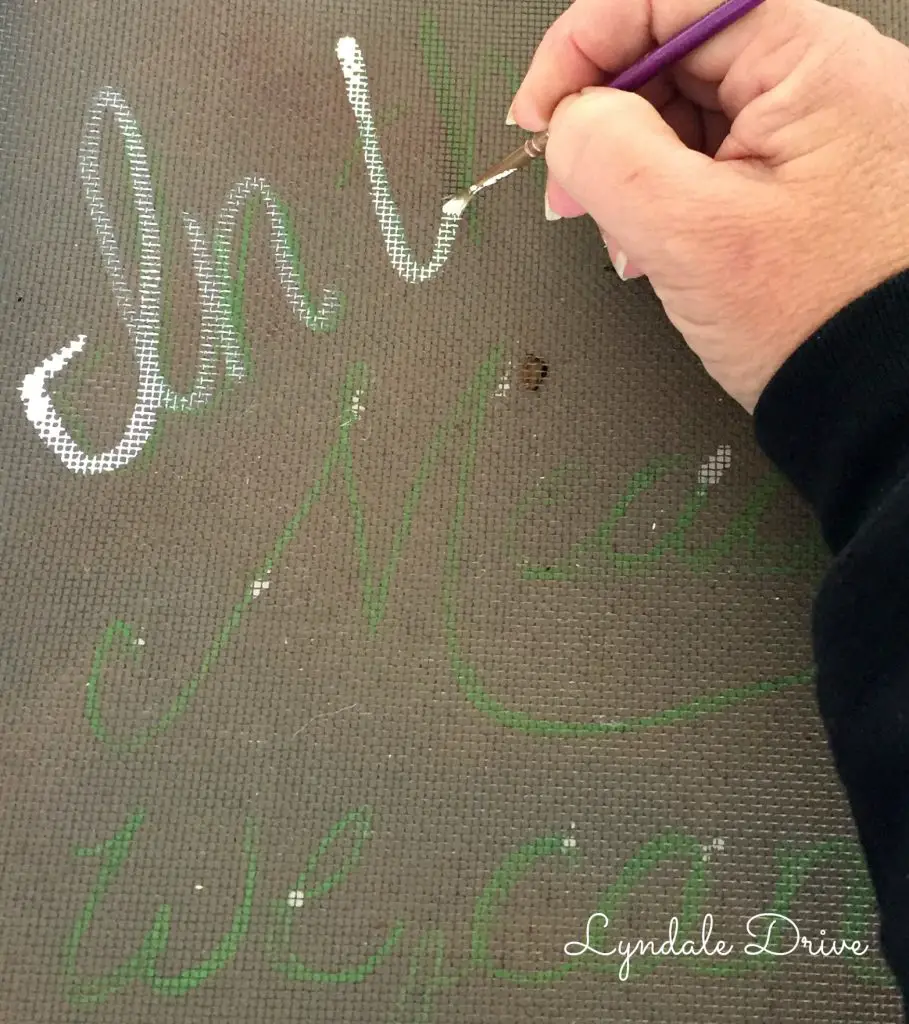
You can see how I have made several lines in some places, allowing me to get it just right, before I actually paint it…………and since it is a chalk marker, I can erase it all together if I want!  You can see under the word MEADOW how I drew a straight line, I won’t paint it on my design, but it keeps my lettering straight.

Next I drew out the outline of my snowman.

painting-on-screen
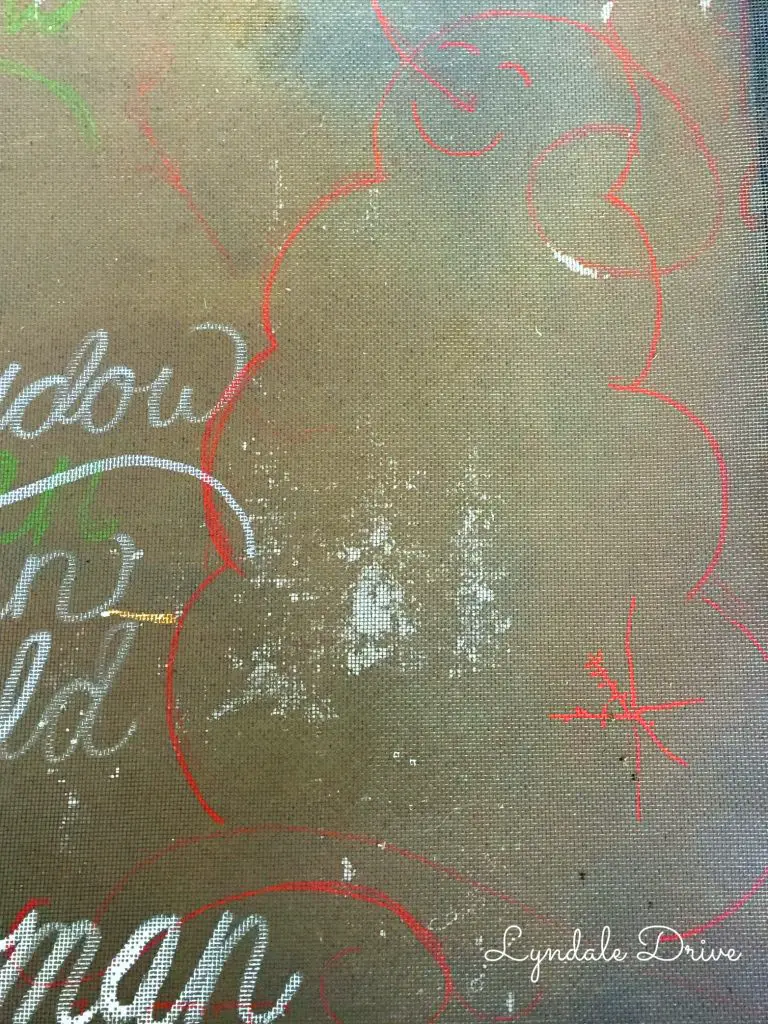
Don’t mind the white spots, it’s left over paint from my last project!  After my design is drawn out the way I like it, I lay the screen over top of my design and trace the lines I drew on the table onto my screen with the paint. trace-the-designOnce I have the lettering all painted (at least the first coat) I place the screen over the design so placement is just where I want it and then paint the outline.  For this snowman design, I only drew the outline on the table.  When it came to “decorating him”  I free handed it………….I trusted myself enough for that!
painting-screen-designAfter I have all my outlines and lettering painted I continue to add paint and go over each line until the screen is covered with paint making the paint look darker.  I continue to add design details to the screen until it looks like I want it, some of the lines being darker than others which gives it dimension.
how-to-paint-on-screenBest part about this technique, when you are done painting, all you need to do is wipe your table with a wet cloth and the clean up is done!  All you are left with is a cool piece of artwork and a clean table! (If you don’t have a table like I do, you could always print a picture you like and tape it to the back of the screen and trace away.)

Here are a couple more designs I painted.  I hope I will inspire you to try your hand at painting some screens ……………..Christmas is right around the corner you know!!!

painted-screen

paint-a-screen

paint-on-screen

Happy Painting!!  I would love to hear about and see your designs – hop over to my Facebook page and share your style!  Want to make sure you remember how to make your own?  – Better Pin Me!how-to-paint-on-old-screensSignature LD

  • Tweet
  • Email
  • Print

11 Comments
DIY// Front Porch// Garden

« A New Coat of Paint for the She Shed
Dimming the light that shines in the night »

Comments

  1. Tracy says

    November 10, 2016 at 8:13 pm

    I will have to send you mine….ummm you make it look so easy so I will go for it! I am not a good free hander but certainly will give it a shot!!! Thank you for this!!!

    Reply
    • Jodi says

      November 10, 2016 at 8:26 pm

      You can do it Tracy – try my table technique, you can erase when you need to!!!

      Reply
      • sunny says

        March 2, 2018 at 8:51 am

        thank you for these tips you make it look easy enough that I am sure I can do it..

        Reply
        • Jodi says

          March 2, 2018 at 10:02 am

          I bet you can!!!! When you are done if you are on IG share your project and be sure to tag me so I see it!! have fun!!!

          Reply
  2. Grace says

    April 9, 2018 at 2:27 pm

    Do you spray paint a top coat on it to protect it? They are really beautiful!

    Reply
    • Jodi says

      April 11, 2018 at 12:12 pm

      Hi Grace,
      I don’t spray my screens with anything because I generally use them on my porch and they are not in the elements. However, you could sure spray them with a clear poly for protection if yours will be in the elements!.

      Jodi

      Reply
  3. Mary says

    May 21, 2018 at 8:14 am

    Thank you for the clever idea!! I do not have stencils, but I can use your chalk idea to transfer onto my beautiful old screen.

    Reply
    • Jodi says

      May 30, 2018 at 8:00 pm

      Hi Mary!
      Using chalk has sure saved me from a lot of headaches! Good luck to you with your project.

      Reply
  4. Chrissi says

    July 29, 2018 at 7:12 pm

    What type of paint did you use? I used all purpose acrylic and I don’t like the result

    Reply
    • Jodi says

      August 28, 2018 at 6:36 pm

      Hi Chrissi,
      I used acrylic also. I will say you have to apply several coats to get good coverage. Hope this helps
      Jodi

      Reply

Trackbacks

  1. Holiday Home Tour {part 1} says:
    December 11, 2016 at 7:18 pm

    […] You all know I love decorating our front porch throughout the year, changing it with the seasons.  Well Christmas is no different and like many of you, it’s one of my favorite seasons to decorate for.  This is where my holiday decorating began and is what laid the foundation for this years theme throughout the rest of the house.  It all started with the old screen that I painted.   Learn how to do it here! […]

    Reply

Leave a Reply Cancel reply

Your email address will not be published. Required fields are marked *

This site uses Akismet to reduce spam. Learn how your comment data is processed.

Hello! I’m Jodi

I'm glad you're here! This is where I make my dreams of DIY projects, home renovations and crafty ideas become reality. {I am serious - I dream of these things} I hope you decide to stick around, and follow along as my husband Mike and I make these dreams a reality.

Never Miss Another Post

If you love what you see now and don't want to miss another post....Join Me! I promise I won't flood your email with junk, only a friendly reminder that I published a new post!

Categories

Archives

how-to-paint-faux-brick-concrete-walls
painting-your-garage-door-black
  • Home
  • Meet Us
  • Our Home
    • Master
      • Shiplap Shelf
      • How to keep your white sheets white
      • How to upcycle old sweaters into Christmas stockings
      • Dimming the light that shines in the night
      • Master bedroom night stands
      • Our Master “Pinterest” bedroom……
      • Shiplap wall for less than $50
    • Mancave
      • How to build a sliding barn door
      • The Dog’s House
      • A Shiplap Ceiling
      • Painting a Faux Brick Wall
      • Upcycle old frames….I’ll show you how!
      • A bi-fold door in disguise……….
      • A place to call his own……..kind of!
      • how i made industrial lights for the bar
    • Front Porch
      • Hydrangeas are in the air
      • Red, White and Gray-It’s almost Independence Day!
      • Say Hello
      • Holiday Home Tour (Part 1)
    • Kitchen
      • Upholstery 101
      • Harvest Table – Part one
      • Harvest Table – Part Two
      • Holiday Home Tour (Part 2)
      • How to organize a mini office space in your pantry
      • New Bling {Cabinet Hardware} for the Kitchen
      • Transform your dining room table
      • Trays, not just for carrying your lunch in grade school anymore!
    • Living Room
      • Designing a fireplace makeover
    • Garage
      • Got Paint?
  • DIY Projects
    • Painting/Crafts
      • DIY Poster Sized Word Art
      • Fresh Cut Tree Sign
      • Farmers Market….
    • Simple Sewing
      • Add your favorite recipe to a tea towel
      • How to upcycle old sweaters into Christmas stockings
      • Vintage Stockings for $3 or less
      • Upholstery 101
    • Trash to Treasure
      • How to paint on old screens
      • New life for an old brass fixture
    • Miscellaneous
      • How to keep your white sheets white
      • New Bling {Cabinet Hardware} for the Kitchen
    • Electircal
      • how i made industrial lights for the bar
    • Woodworking
      • How to build a sliding barn door
  • Contact Me
    • Disclosures

Copyright © 2021 · Dainty theme by Restored 316

loading Cancel
Post was not sent - check your email addresses!
Email check failed, please try again
Sorry, your blog cannot share posts by email.